那天在 Akureyri 阿克雷里剛好準備回房間時, 突然極光爆發! 沒有時間拿腳架, 相機 AUTO 拍到如此強大的景色!
We have just finished our 15 day trip in Iceland and want to share some of our experiences on how to find and take pictures of the Northern Lights. Spotting the Northern lights can be a little difficult if you have not seen one with your eyes before. Usually the Northern Light appears significantly different to our naked eyes compared to what can be captured on the camera. To get out here and see this amazing view then you should get car rental iceland so you have transportation and get there on time.
We took this picture at a light house near a small town called Kopasker. Totally worth staying out till 12am.
Northern Light is technically always there in the Aurora Oval but requires darkness to be seen. The Northern countries in the Aurora Oval has no complete darkness throughout summer, so the Northern Light is impossible to be seen during then.
The green in the picture is the Aurora Oval. To see the Northern lights, you have to be within the Aurora Oval. Iceland is one of the countries that is completely within this zone.
Iceland is dark enough at night to see the Northern lights between September and March. November and December will be the darkest and have the longest Nights, however we had enough darkness and saw plenty of Northern Lights in September during our 15 days in Iceland. September is quite a good time visit Iceland as most of the attraction is not yet closed for winter. We usually begin to spot the Northern Lights after Sunset around 9:30pm on a clear day. They usually remain quite visible constantly all night at various intensity.
September is a great time to visit Iceland. This is a photo of the Thingvellir National Park in the Golden Circle in September.
There is a website that specifically forecast the Aurora for Iceland. (Aurora Forecast website)
Usually you can see the forecast for three days ahead. The following is a quick tutorial on how to read this website.
This is a picture which I took off the Aurora Forecast website for Iceland. Read the following for instructions.
The clouds cover is usually the reason that stops us from seeing the Northern Lights. We have seen the Northern Light every night that we had a clear sky. You can always drive towards the white spots on this cloud map to find clear sky.
It is easier to take photos of the Northern Lights in winter because it gets dark earlier. The top is a picture I took at 9:50pm and the bottom was taken at 11:00pm.
If you don’t have a car to get out of the city where it is dark enough, you can join a tour. Tours come with a free do-over if you don’t see any Northern Lights. On our first night we plan to join the Gray Line Northern Lights Tour (website),€45 per person. However it was canceled because of rain and they refunded our money. I would still recommend to join the Northern Light tour as they would teach you how to recognize the Northern Lights.
When we failed to join the Northern Lights tour we were afraid that we won’t be able to find the Northern Lights ourselves. Fortunately we did find and take pictures of the Northern Lights.
Many people imagine the Northern Lights as circles of dancing green light in the sky. In reality, rarely does the intensity of the Northern Light become this strong. Most of the Northern Lights we have seen appears to be a long white cloud like shape in the sky. We had a friend that was driving in Iceland looking for the Northern Lights for hours and thought the white Northern Lights were just clouds. We would only occasionally see some green colors in the light after observing it for a while.
The reason I took this photo is because we thought this patch of cloud was the Northern Light. However after taking a photo with long exposure we confirmed that it is just a patch of cloud. The Northern Light does look quite similar to this though!
Cameras can capture more light and colors than the human eyes. This is because the sensors in the camera are more sensitive than the human eye. If the sensors are large enough and you have exposure long enough, you can capture all the colors of the Northern Light. The grey patches in the sky will come out extremely green and beautiful in the camera. Hence this is why joining a tour is beneficial as they can help you recognize which white patches in sky is the Northern Light.
We soon found the Northern Light in the sky. With long exposure on the camera, we can capture the green color of the Northern Light.
We did encounter a few days of more intense light where the color green does appear in the sky. One of the nights we were extremely lucky and captured an explosion of colors in the sky. Winny was simply shooting in Auto Mode on her camera with no exposure and took a few awesome pictures. In essence, you need some patience and luck to capture very beautiful photos of the Northern Light.
That day at Akureyri, we were saw the most intense Northern Light just before we were going back to our room. Since we had already packed up our camera stand we were taking photos on Auto Mode with no exposure! We got some very awesome photos
To properly take photos of the Northern light, you need a camera with the following criteria:
The camera we used to take these pictures is a compact camera, so don’t feel that you need a DSLR or mirrorless to capture the Norther Lights. The reason why we are using a compact camera is because we are currently travelling for one year with an 8kg back pack and require something small and light. However many people thought that we were taking these photos with a DSLR when we shared them online.
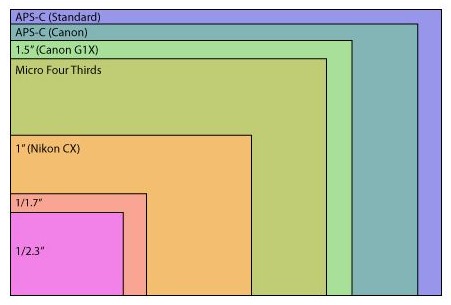
Differences with the sizes of sensors in different cameras. Our RX100 camera sensor has 1″ in size (same size as Nikon CX). Most DSLR has the same size as Micro Four Thirds.
Our current camera is Sony DSC-RX100M III
I took this with the Sony Rx100M3 last month at our friend’s wedding in Edenborough. It performs excellently at low light and can capture the groom and his mother clearly during middle of their dance.
To take pictures of the Northern Lights, you normally have to expose the picture for more than 10 seconds, therefore you can’t just hand hold your camera. You can’t just prop your camera on an object because it’s hard to make the camera point to the sky. This is why a tripod is necessity to take pictures of the Northern Lights. However you do not require a huge 1kg tripod. Any tripod that can help you point your camera into the sky is enough. My personal favorite is the GorillaPod Magnetic Tripod
Magnetic GorillaPod is very useful, especially when you can attach it to car doors to take pictures of the Northern Lights.
The following is a series of pictures where we have not done any photo editing. These are JPEG photos where I directly taken out of our cameras. Normally with some simple editing, you can enhance the green in the photos more dramatically. Professional photographers will usually shoot in RAW and fix each photo with Photoshop so each photo will look even more stunning than JPEG. Naturally we are not professionals, so following is our experiences on how we adjust our camera to take pictures of the Northern Light
I was first shooting in Auto white balance and wasn’t getting the color that I was hoping for. Later I changed the white balance to“Incandescent”and was getting the color I wanted.
On this day, the Northern Lights was not as bright as I wanted and we could not see that many shades of green color. Only after we took some pictures, we realized that there was a lot more Northern Lights in the sky.
If you want to take pictures of the Northern lights with a person, you need to do your exposure (ie. 10-20 seconds) and flash your person.
During our visit in Iceland, we were having a full moon which was a little annoying. The manual setting I used when taking pictures under the moon is quite different compared to no moon. I was mainly adjusting the ISO and the white balance and usually kept the exposure time to 10 seconds.
There was a car that drove past during our exposure so I got these red lines. The moon was too bright at that time so I increased my “F” to shrink my aperture a little.
At a light house north of Iceland. To take pictures of the Northern lights here was quite cold.
As the moon was too bright, the color of the sky changes color when I expose the picture. The photo can look significantly better after I adjust the photo with a photo editor.
This is the difference between the pictures before and after I fixed this photo up with a mobile app called Snapseed. The brightness of the Northern Light can be enhanced but the clarity is slightly lost. This won’t be an issue if we shoot in RAW.
The above is our experience at taking picture of the Northern lights. During our 7 days in northern Iceland, we had 4 days of clear nights. We were able to take pictures of the Northern Lights on every clear sky night. Unfortunately after we started travelling south we were getting clouds every night. Apparently Reykjavík commonly has a cloudy sky, so you may require to travel further North to increase your chances to see the Northern Lights.
View Comments
Thank you VERY MUCH for this informative post! You gave very useful information! I have a Sony RX100M1 and will be traveling to Iceland this fall. Your post gives me hope that I can capture this amazing phenomena!